A water damaged ceiling can be unsettling, whether you notice a fresh stain, peeling paint, or a sagging spot overhead. Acting quickly helps limit damage and protects your home from mold, electrical hazards, and a possible ceiling collapse. Start by stopping the water source if you can, then document the damage and avoid disturbing any weakened areas. Here’s how to handle the first steps, identify common causes, and determine when professional repair is the safest choice.
Water-damaged ceilings require quick action to stop the source, protect the room, and prevent sagging, mold, or structural failure. Move belongings, contain drips, and shut off nearby power if water is close to fixtures. Once the leak is resolved, a thorough moisture assessment determines whether drywall or plaster can be repaired or must be replaced, followed by texture matching, stain sealing, and repainting.
A water damaged ceiling needs prompt attention, even when the visible damage looks minor. At MrWalls Drywall & Painting, we first help homeowners stop the water source, protect the room below, and assess whether the ceiling materials can be safely dried or need repair. Fast action limits water damage, protects your home, and makes the restoration process more manageable. Contact a professional if you are unsure where the water is coming from.
When you discover a ceiling leak, move furniture, rugs, and electronics away from the affected area. Place a bucket beneath active dripping water and use towels to protect the floor. If water is near a light fixture, turn off power to that area at the breaker before touching anything nearby. Do not remove a fixture or open the ceiling unless you know the electrical circuit is safe.
Next, identify the likely source. A leak may come from a plumbing line, an upstairs bathroom, a roof opening, or an appliance connection. If possible, shut off the water supply serving that fixture. For roof-related ceiling leaks, contain the drip and arrange for professional help rather than climbing onto a wet roof.
Water stains can remain after the source is fixed, but they should not be covered with paint until the area is completely dry and the damaged drywall or plaster has been evaluated. Soft material, peeling paint, a musty odor, or recurring stains usually mean moisture remains behind the surface. We inspect the affected area, remove unsalvageable material when needed, dry the structure, and prepare the ceiling for a lasting repair.
A sagging ceiling is more serious than a cosmetic water mark. It can mean water has soaked into drywall, plaster, insulation, or framing above, adding substantial weight to materials that were not designed to carry it. A rounded bulge, cracks around the sag, active drips, or a ceiling surface that feels soft are signs to treat the situation as urgent.
Keep people and pets out of the room, especially away from beneath the affected section. Do not press, poke, or try to drain a swollen ceiling yourself. While a water-filled area may eventually release, disturbing weakened material can cause a larger collapse and spread contaminated water or debris across the space. Turn off electricity to nearby lights if it can be done safely, then contact a qualified water damage contractor.
Once the source is stopped, our team assesses the extent of ceiling damage and checks for wet insulation, compromised drywall, and hidden mold growth. Mold can begin developing in damp materials quickly, particularly in warm, enclosed spaces. Proper repair may involve controlled removal, structural drying, replacement of damaged drywall or plaster, and finishing work that blends cleanly with the rest of the ceiling. Acting early helps prevent mold and avoids a small leak becoming a major restoration project.
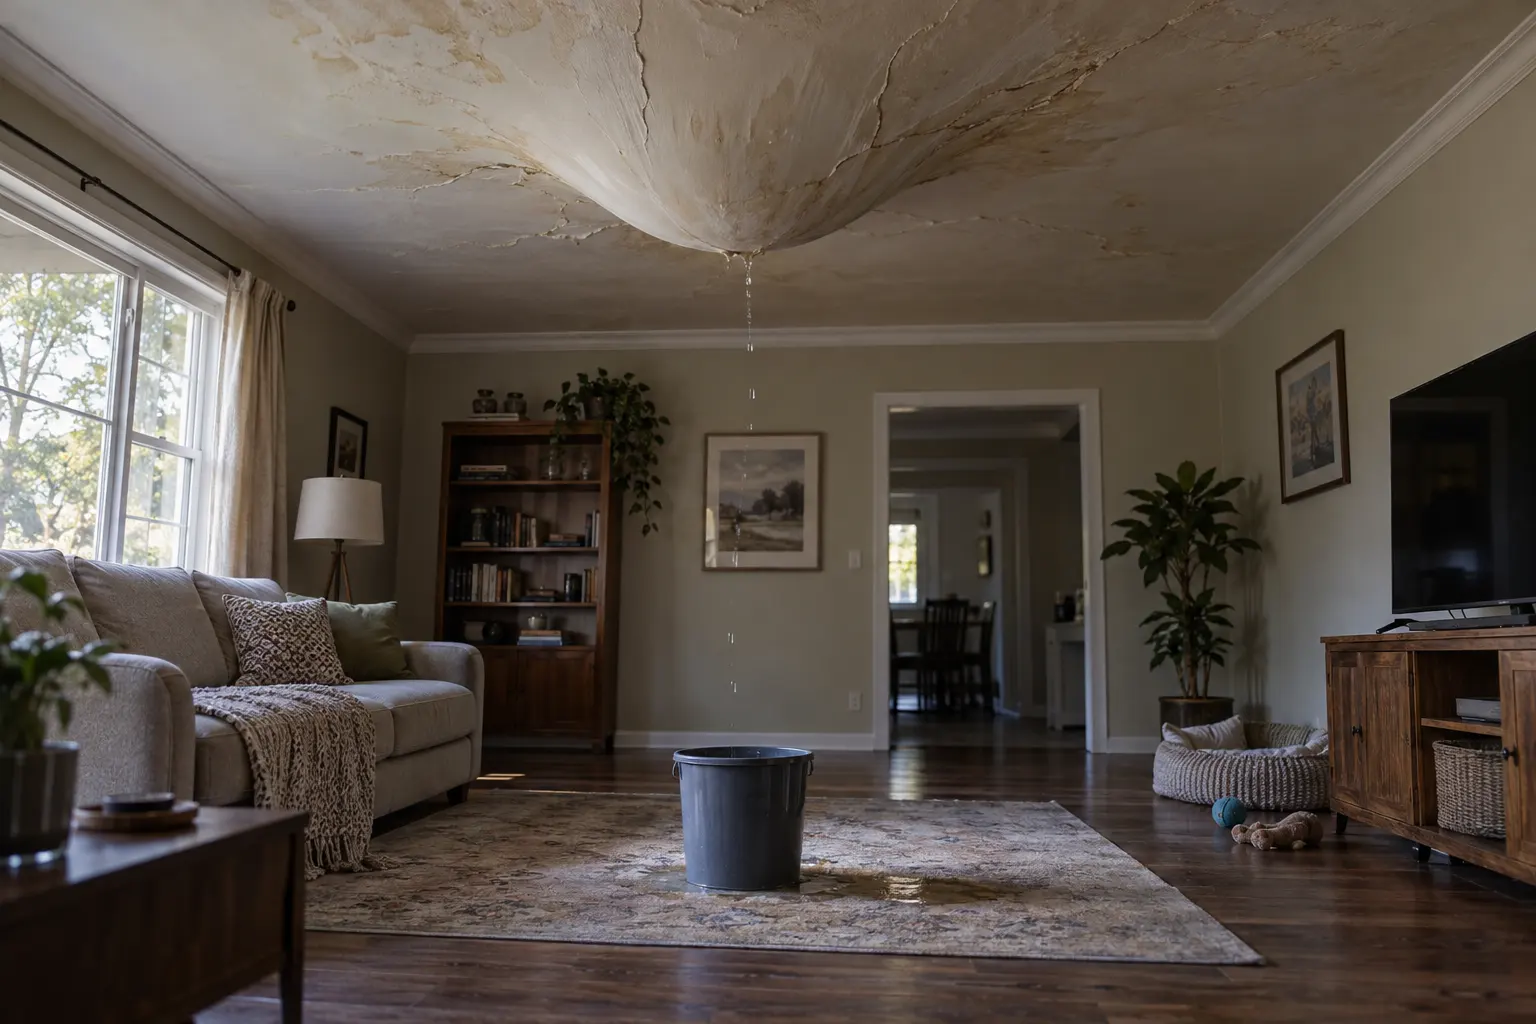
As a water damage repair contractor with MrWalls Drywall & Painting, I see the same pattern often: a ceiling stain appears small, but the water behind it has usually traveled farther than the homeowner expects. Gravity pulls moisture to the lowest point, so the spot on your ceiling may sit several feet away from the actual leak.
Bathrooms are frequent trouble areas. A slow plumbing leak from a shower drain, toilet supply line, tub overflow, or upstairs pipe can soak framing and drywall before it becomes visible below. Drain pooled water is another common issue, especially when a clogged drain allows water to escape a shower pan, sink cabinet, or utility area. Even a one-time overflow can leave damp insulation and weakened ceiling material.
Roof leaks are equally common in our local area, particularly after hard rain, wind-driven storms, or long periods of wear around flashing, vents, skylights, and damaged shingles. Water can enter at the roofline, move along rafters, and collect above a ceiling until the drywall discolors, sags, or breaks open.
HVAC systems can also cause water damage. Condensation line clogs, overflowing drain pans, and poorly insulated ductwork may drip steadily onto ceilings. Whatever the source, I recommend addressing it quickly. Stopping the leak comes first; then we can dry the affected area, assess the drywall or plaster, and make repairs that restore a clean, solid finish.
A water damaged ceiling can look like a simple brown stain, but the visible mark often tells only part of the story. At MrWalls Drywall & Painting, we assess the ceiling from the finished surface through the drywall cavity above it, looking for trapped moisture, weakened materials, and the source that caused the damage in the first place. A water-damaged ceiling may hold moisture long after a leak stops, especially around light fixtures, seams, insulation, and framing.
Our first priority is water mitigation: stopping active water intrusion and protecting the surrounding rooms from further damage. We then inspect the affected area for softness, sagging, peeling paint, cracked joint compound, and changes in the drywall’s structure. Moisture readings help us determine whether the material can remain in place or needs to be removed. This matters because covering a stain without addressing damp materials can lead to recurring discoloration, odor, or further ceiling failure.
Not every ceiling needs a full replacement. When drywall is structurally sound and can be fully dried, targeted repairs may be the right solution. If water has caused the board to swell, crumble, or lose its strength, we remove the compromised section and prepare the area for a clean, lasting repair. We also check nearby walls and adjoining ceiling sections, since water can travel farther than the original stain suggests.
Once the area is dry and stable, we can repair drywall, match texture, seal remaining discoloration, and repaint the ceiling so the finished result looks intentional, not patched. Careful assessment at the start protects both your home and the quality of the repair.
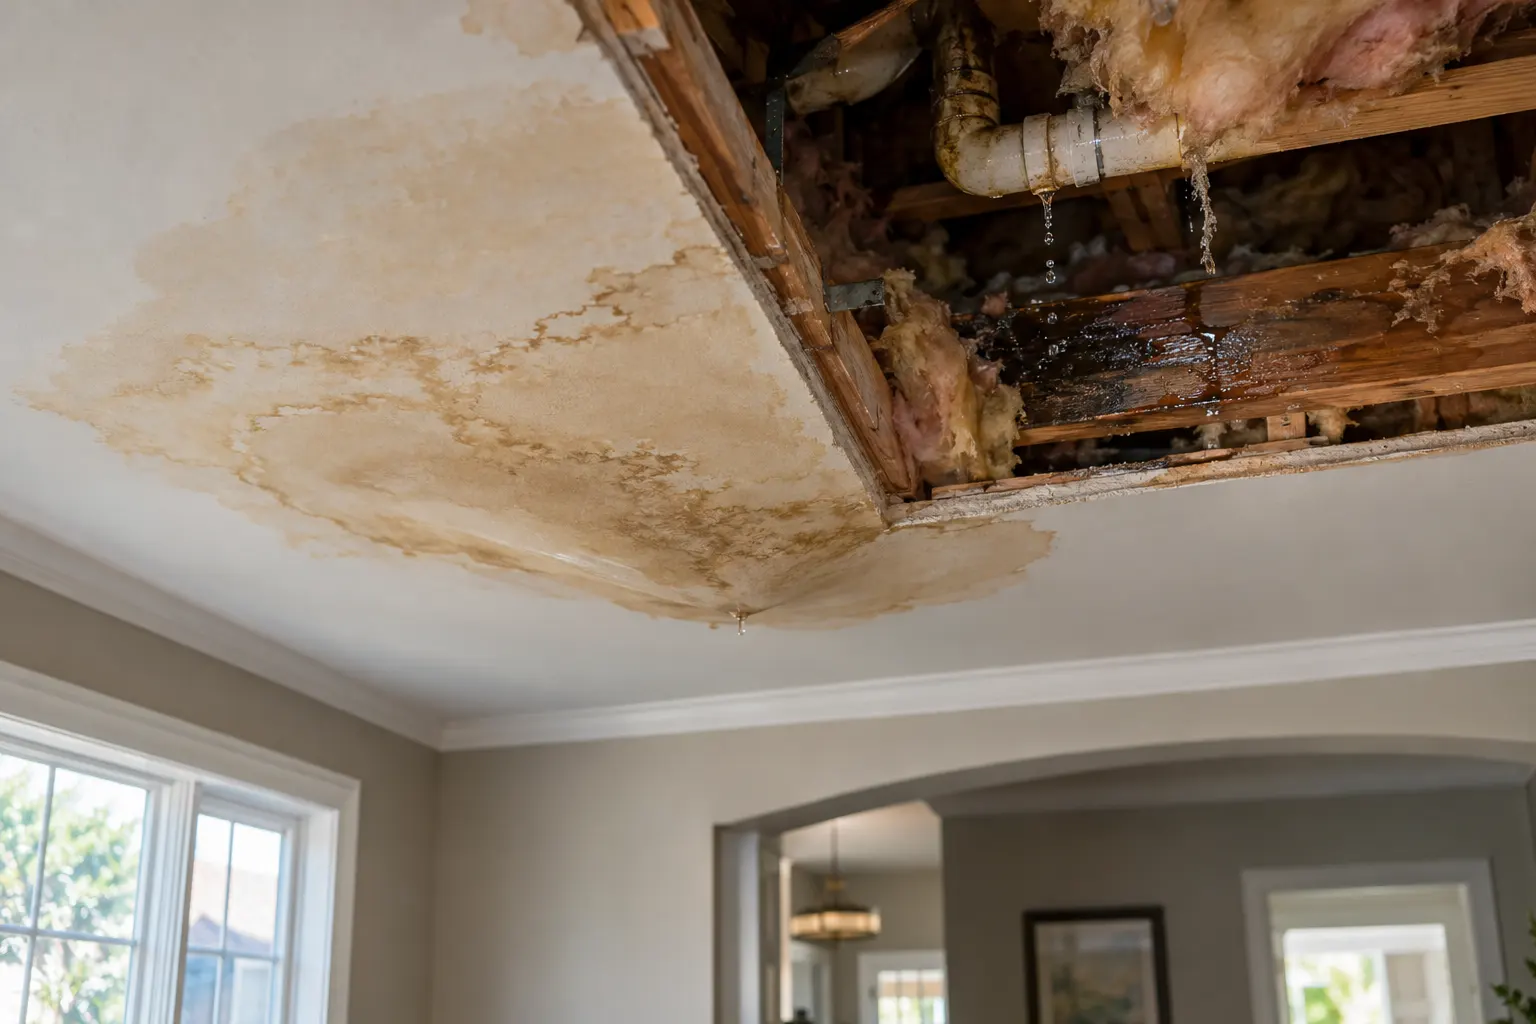
As a water damage repair contractor, I help homeowners decide whether ceiling repair is enough or replacement is the safer answer. When water damage is small, dry, and cosmetic only, a focused repair can restore the surface. Choose DIY if the damaged area is limited, the source is fixed, and the ceiling feels solid; otherwise, professional evaluation is the wiser fix.
Every ceiling repair starts with the cause of the damage, not the stain left behind. Water can travel along framing, insulation, and drywall before it appears overhead. At MrWalls Drywall & Painting, I first confirm that the leak, condensation issue, or plumbing failure has been corrected. Repairing a ceiling before the moisture source is resolved only invites another failure.
With drywall, I check for softness, sagging, swollen seams, loose tape, and mold-like growth. A small, dry stain may need sealing, patching, texture matching, and paint. But drywall that has lost its shape or strength should be removed and replaced. Hidden wet insulation may also need attention, since it can hold moisture against the ceiling.
Plaster requires a different approach. Hairline cracks can often be stabilized and filled, while loose or crumbling plaster may need reattachment or removal down to sound material. The right repair depends on the ceiling’s age, construction, and extent of damage. A careful inspection protects the finish you see and the structure behind it.
| Repair consideration | Drywall ceiling | Plaster ceiling |
|---|---|---|
| Moisture source | Confirm leaks, condensation issues, or plumbing failures are corrected before repair. | Confirm leaks, condensation issues, or plumbing failures are corrected before repair. |
| Warning signs | Check for softness, sagging, swollen seams, loose tape, and mold-like growth. | Check for loose or crumbling plaster and hairline cracks. |
| Minor damage repair | A small, dry stain may need sealing, patching, texture matching, and paint. | Hairline cracks can often be stabilized and filled. |
| More extensive damage | Drywall that has lost its shape or strength should be removed and replaced. | Loose or crumbling plaster may need reattachment or removal down to sound material. |
| Additional inspection needs | Hidden wet insulation may need attention because it can hold moisture against the ceiling. | The repair approach depends on the ceiling’s age, construction, and extent of damage. |
At MrWalls Drywall & Painting, we treat a damaged ceiling as part of the room’s structure and finish, not simply a surface to cover. As a water damage restoration company and repair contractor, we inspect the cause before we close anything up. A roof leak, plumbing failure, overflowing fixture, or ongoing humidity can leave wet insulation, weakened drywall, stained plaster, and hidden moisture above the ceiling. Our first job is to determine what can be saved and what needs to be removed for a sound, lasting repair.
Once the area is dry and stable, our team restores the ceiling with careful attention to its original character. That may include replacing damaged drywall, repairing plaster, reinforcing seams, matching texture, and correcting water stains that would otherwise show through fresh paint. We prepare each surface properly so the final painting work looks even in natural light and holds up over time.
Our services are designed to make an inconvenient problem feel manageable. We explain the recommended scope, protect surrounding rooms, and keep the work area orderly from demolition through final touch-ups. Whether the damage is limited to a small ceiling patch or affects several rooms, we provide a clear, professional service focused on clean finishes and dependable results. The goal is simple: restore the ceiling so it looks right, feels secure, and no longer reminds you of the damage that brought us there.
When water enters your home, clear documentation can make the insurance process far less stressful. At MrWalls Drywall & Painting, we recommend taking photos and videos before any cleanup begins, if conditions are safe. Capture the source of the leak, standing water, wet flooring, damaged drywall or plaster, and close-up images of water stains. Then take wider photos that show where the damage sits within the room.
Keep a simple written record as well. Note the date and time you found the problem, when the water source was stopped, and which areas were affected. If you move furniture, remove wet materials, or arrange emergency drying, save every receipt and invoice. Your insurance adjuster may need to see the steps taken to prevent further damage, along with the costs involved.
I also suggest keeping samples or photos of materials that need to be removed, such as swollen baseboards, stained ceiling texture, or crumbling plaster. Do not throw away damaged items until your insurer confirms it is appropriate. A professional assessment can help identify moisture behind walls and ceilings that may not be obvious in surface photos.
Once the claim is underway, our team can provide a detailed scope for water damage repair, including drywall replacement, plaster restoration, texture matching, and painting. Good records help support the work your home truly needs and give everyone a clearer path from emergency service to a finished, restored space.

As a water damage repair contractor with MrWalls Drywall & Painting, I have seen how a small ceiling leak can turn into a costly repair when it is ignored. The best protection for your home is regular attention to the places where water enters, travels, or collects. Check the roof after heavy rain, especially around flashing, vents, skylights, and chimney areas. Inside, look under sinks, around toilets, behind appliances, and near HVAC equipment for slow drips or damp connections.
Pay attention to early warning signs overhead: a faint brown ring, peeling paint, soft drywall, a musty odor, or a ceiling that begins to sag. These conditions often mean water has been present longer than expected. Addressing the source quickly limits damage and helps prevent mold from taking hold in insulation, framing, and wall cavities.
Simple maintenance makes a real difference. Keep gutters and downspouts clear so rainwater moves away from the house. Make sure attic ventilation is working, since trapped humidity can create condensation that looks much like a roof leak. Replace worn caulk around windows and exterior penetrations, and have aging plumbing fittings inspected before they fail.
If you notice a new stain or active dripping, place a container beneath it and avoid poking or cutting into a bulging ceiling without professional guidance. Water can collect above the drywall and cause a sudden collapse. A prompt inspection can identify whether the issue comes from the roof, plumbing, condensation, or an upstairs fixture. Once the leak is repaired, we can help restore damaged drywall or plaster properly, so your ceiling looks finished, not merely covered up.
As a water damage repair contractor, I know a water damaged ceiling can raise urgent questions. Homeowners often ask whether a stain will dry on its own, if a sagging ceiling is dangerous, or whether paint can cover the problem. The short answer is that the visible mark is only part of the issue. Before we recommend a fix, our team at MrWalls Drywall & Painting identifies where the moisture came from, checks whether the material is still wet, and looks for weakened drywall, plaster, insulation, or framing. A small stain from an old, fully repaired leak may need limited ceiling repair. A fresh leak, soft spot, peeling texture, or bowing area needs prompt attention to prevent a larger repair and protect the room below. Do not poke, cut, or paint a damp ceiling before the source is controlled. Water can travel farther than the stain suggests, and disturbed material may fall without warning. If the ceiling is sagging, keep people and furniture out from under it and call for professional help right away. We provide clear, practical services that can include moisture assessment, controlled removal of damaged drywall or plaster, drying, structural inspection when needed, patching, texture matching, priming, and painting. Every repair is based on the condition of your ceiling, not a one-size-fits-all solution. Our goal is to restore a clean, solid surface while helping you understand what caused the damage and what steps will keep it from returning.
Protect people and belongings first. Move furniture and electronics, place a bucket under active drips, and turn off power at the breaker if water is near a light fixture. Then stop the water source if possible and arrange for an inspection.
Not always, but it should be checked. A stain may be left from an older leak, yet moisture can remain inside drywall, insulation, or framing after visible dripping stops. Recurring stains, soft spots, peeling paint, or musty odors suggest an ongoing moisture problem.
Yes. A bulging or sagging ceiling can contain trapped water and weakened drywall or plaster. Keep people and pets out of the area, do not poke or puncture the ceiling, and safely turn off nearby electrical power if needed. Contact a qualified water damage contractor promptly.
Sometimes. Small areas may be repaired if the leak is fixed, the material is fully dry, and the drywall or plaster remains solid. Swollen, soft, crumbling, sagging, or mold-affected material usually needs controlled removal and replacement.
Drying time varies with the amount of water, airflow, humidity, insulation, and the materials involved. Surface dryness can be misleading, so moisture readings and an inspection help confirm whether the ceiling cavity and surrounding structure are dry enough for repair.
Only after the leak is corrected and the ceiling is fully dry and structurally sound. Damaged drywall should be repaired first. A stain-blocking primer can help prevent old discoloration from bleeding through the final ceiling paint.
Common causes include roof leaks, plumbing leaks, overflowing upstairs fixtures, clogged drains, shower or tub leaks, HVAC condensation line clogs, and overflowing drain pans. The visible stain may be several feet from the original source because water travels along framing.